kubeflow adapter repository 기여_3
이번에는 실제로 코드를 기여해보고 새롭게 직접 pod에 적용해려고 한다.
pipeline_JSONformat_jira
먼저, pipeline_list 함수를 실행했을 때 원하는 JSON 형식이 jira에 올라와 있어 이에 맞게 kfadapter_main.py를 수정해주었다.
kfadapter_main.py
@APP.route("/pipelines")
def list_pipelines():
    pipe_dict = {}
    try:
        pipeline_list = KFCONNECT_KF_OBJ.get_kf_list_pipelines()
        pipe_dict['next_page_token'] = pipeline_list.next_page_token
        pipe_dict['total_size'] = pipeline_list.total_size

        pipelines = []
        for pipeline in pipeline_list.pipelines:
            pipe_super_dict = {}
            pipe_super_dict['pipeline_id'] = pipeline.pipeline_id
            pipe_super_dict['display_name'] = pipeline.display_name
            pipe_super_dict['description'] = pipeline.description
            pipe_super_dict['created_at'] = pipeline.created_at
            pipelines.append(pipe_super_dict)
        pipe_dict['pipelines'] = pipelines

    except:# pylint: disable=bare-except
        tbk = traceback.format_exc()
        LOGGER.error(tbk)
        raise BadRequest('Unsupported error from Kubeflow',\
                status.HTTP_500_INTERNAL_SERVER_ERROR, {'ext': 1}) from None

    return jsonify(pipe_dict), status.HTTP_200_OK
pipeline dict에 pipeline list를 확인하기위해 next_page_token과 total_size 값을 추가해주었고, pipeline value를 추가해 pipieline끼리의 id, name, desc, time [] 안에 적도록 했다.
이를 테스트하기 위해 다음과 같은 과정을 거쳤다.
kfadapter_test_image.sh이미지 생성sudo buildctl --addr=nerdctl-container://buildkitd build \ --frontend dockerfile.v0 \ --opt filename=Dockerfile \ --local dockerfile=/home/hoseong/workspace/kfadapter \ --local context=/home/hoseong/workspace/kfadapter \ --output type=oci,name=kfadapter:zino | sudo nerdctl load --namespace k8s.io결과는 다음과 같다

aimlfw-dep/RECIPE_EXAMPLE/example_recipe_latest_stable.yanmlrepository, tag 변경kfadapter: image: repository: kfadapter tag: zino #repository: nexus3.o-ran-sc.org:10002/o-ran-sc/aiml-fw-athp-tps-kubeflow-adapter-docker #tag: "2.0.0" pullPolicy: IfNotPresent- API 호출 결과
curl -X GET http://10.111.28.123:5001/pipelinescurl -X GET http://localhost:5001/pipelines- port-forward 필요
결과가 잘 나왔다. 이제 gerrit에 올려 review를 해보자. gerrit에 올린 내용은 다음과 같다.
https://gerrit.o-ran-sc.org/r/c/aiml-fw/athp/tps/kubeflow-adapter/+/13348
근데 review 과정에서 kfadapter repo 내부에 있는 test code에서 반려되었다. 확인해보니 test code 중에서 pipeline 정보를 받아오고 이를 JSON 형식이 맞는지 확인하는 과정에서 내가 바꾼 형식과 달라 오류가 생겼다.
/test/test_kfadapter_main.pypipeline.pipeline_id = "pipeline-id" pipeline.description = "pipeline-description" pipeline.display_name= "pipeline-name" self.assertEqual(response.get_data(), b'{"pipeline-name":{"description":"pipeline-description","id":"pipeline-id"}}\n')현재 pipe-name, pipeline-description, pipeline-id 만 받아오고 있는데 이를 다음과 같이 변경해주었다. 이 때, pipeline에서 받아오는 값과 pipeline_list에서 받아오는 값을 구분해주는 것을 주의해야한다.
        pipeline.pipeline_id = "pipeline-id"
        pipeline.description = "pipeline-description"
        pipeline.display_name= "pipeline-name"
        pipeline.created_at = "created-at"
        pipeline_list = ApiListPipelinesResponse()
        pipeline_list.pipelines = [pipeline]
        pipeline_list.next_page_token = "next-page-token"
        pipeline_list.total_size = "total-size"

    self.assertEqual(response.get_data(), b'{"next_page_token":"next-page-token","pipelines":[{"created_at":"created-at","description":"pipeline-description","display_name":"pipeline-name","pipeline_id":"pipeline-id"}],"total_size":"total-size"}\n')
수정이 잘 됬는지 확인하기 위해 repo 안에 있는 test code를 실행해 봐야한다.
하지만 test코드에 대한 매뉴얼이 없어서 pytest 사용법에 대해 시행착오를 거쳐야했다. test code 실행은 다음과 같은 순서로 진행할 수 있다.
먼저 해당 repo에 가상 환경을 설정하기 위해 venv를 설치해준다.
apt install python3.10-venv
venv를 실행해 주고
python3 -m venv .venv
source .venv/bin/activate
kubeflow-adapter directory에서 해당 repo를 pip pakage로 설치하기 해준다.
pip install .
그리고 필요한 pip들을 설치하기 위해 requirement 파일을 이용하는데, test 용이 따로 없어 만들어 주었다. 특히 kfp, kfp-pipeline-spec. kfp-sever-api는 원래 pod보다 낮은 버전을 사용하기 때문에 이를 유의해야한다.
kfp==1.8.22
kfp-pipeline-spec==0.1.16
kfp-server-api==1.8.5
mock
pytest
Flask==1.1.2
Flask-API==2.0
Flask-Cors==3.0.10
requests==2.25.1
Werkzeug==1.0.1
itsdangerous==2.0.1
jinja2<3.1.0
설정이 완료되면 test 하고자 하는 파일을 수정하고 다음 명령어를 입력해주면 test를 할 수 있다. 이 때, test 폴더 밖에서 이를 실행해 주는 것을 몰라 실수했다.
pytest ./test
실행 결과는 다음과 같다.

이제 test code까지 수정했으니 이미 올린 commit을 수정해주어야 한다. 먼저 수정한 파일을 stage에 올려주고 commit message를 수정해 준다.
git add test/test_kfadapter_main.py
git commit --amend
완성된 commit message는 다음과 같다.
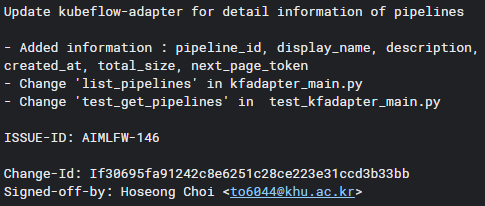
현재 상태를 마지막으로 확인해주고, 혹시 다른 사람이 본인 이후에 commit했을 수도 있으니 이를 변경해주기 위해 rebase를 해주고 review까지 마무리해주면 완성이다.
git log -p
git pull --rebase origin master
git review
대단한 contribution은 아니지만 제대로된 첫 commit이 끝났다.